(This is not AI generated text. This guide is designed for people who need a solution that works fast.)
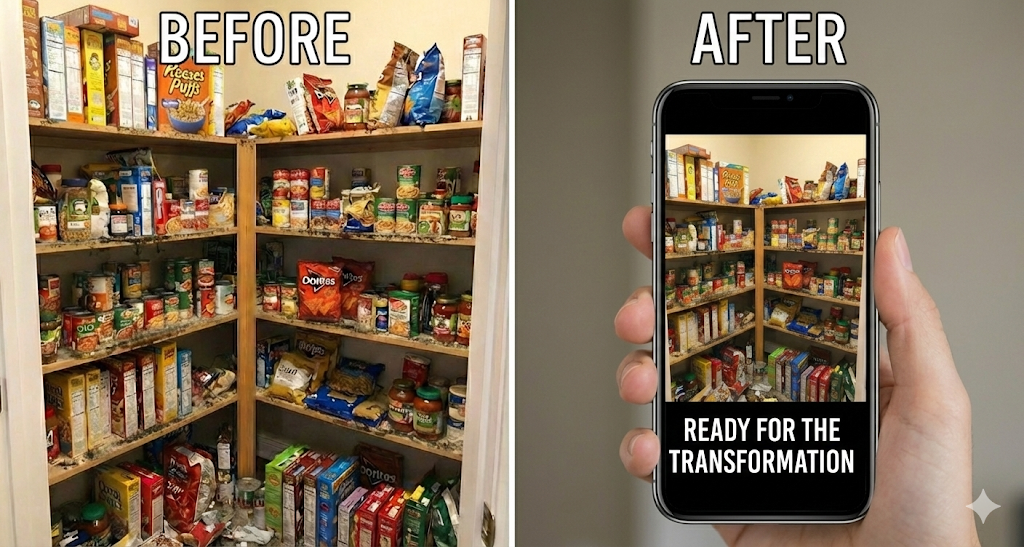
Let’s be real, your pantry is currently a war zone. Between the half-eaten packet of Tim Tams, three different bags of open rice, and the Tupperware avalanche waiting to happen, it’s stressful just opening the door. You want a well organised pantry system that looks like it belongs on Instagram but actually functions for a family with toddlers
If you’ve been scrolling late at night wondering what is the best way how to organise your pantry without spending a fortune or an entire weekend, you have found it. If you need to organise kitchen pantry shelves efficiently, grab a coffee (or wine, I don’t judge) and let’s tackle this list of tips organise pantry experts use. We are starting easy and finishing with the most crucial step!
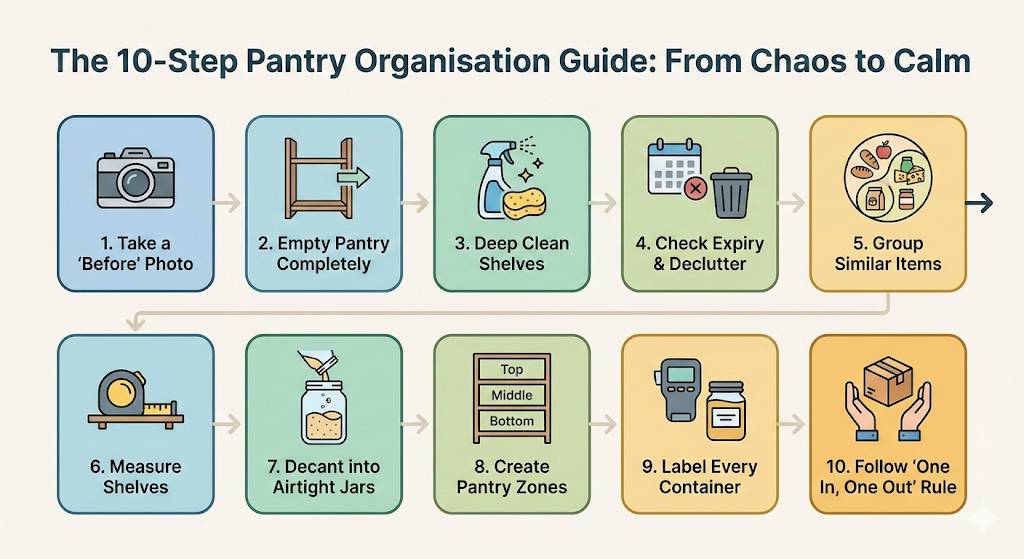
Take a “Before” Photo of Your Pantry
Before you touch a single tin of beans, take your phone out. Open the pantry doors wide and take a photo.
Why? Because in two hours, you’re going to need a morale boost. Seeing how far you’ve come is the best motivation. plus, it keeps you accountable!
Don’t clean it up for the photo! Embrace the mess. The worse the “Before” photo, the more satisfying the “After” will be.
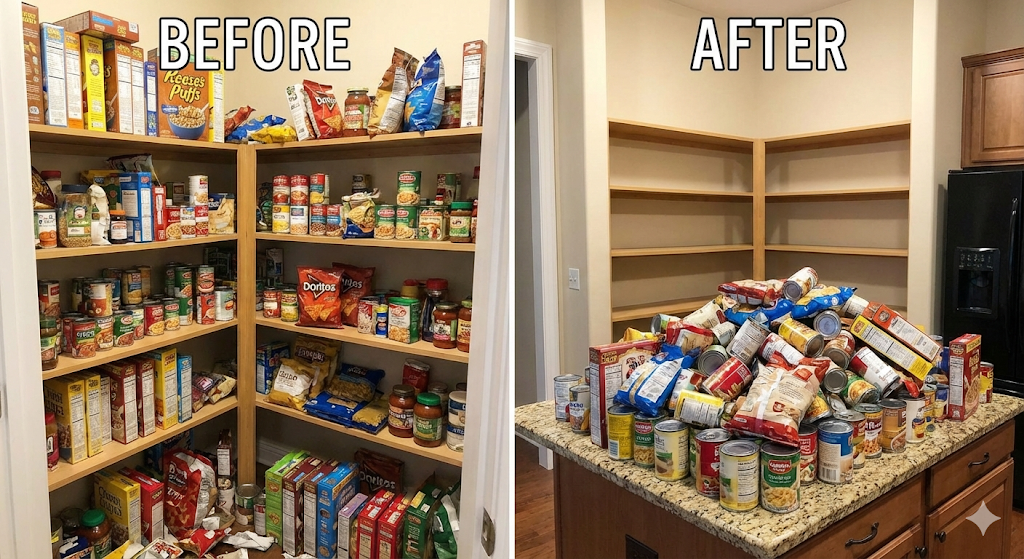
Step 2: Empty Your Pantry Completely
Clear off your kitchen bench or dining table. Now, take everything out. Yes, everything. You will be surprised what you can find deep in the shelves. The pantry must be completely naked.
Do not start sorting yet. Just focus on getting items from the shelf to the table. Speed is key here so you don’t get distracted reading labels.
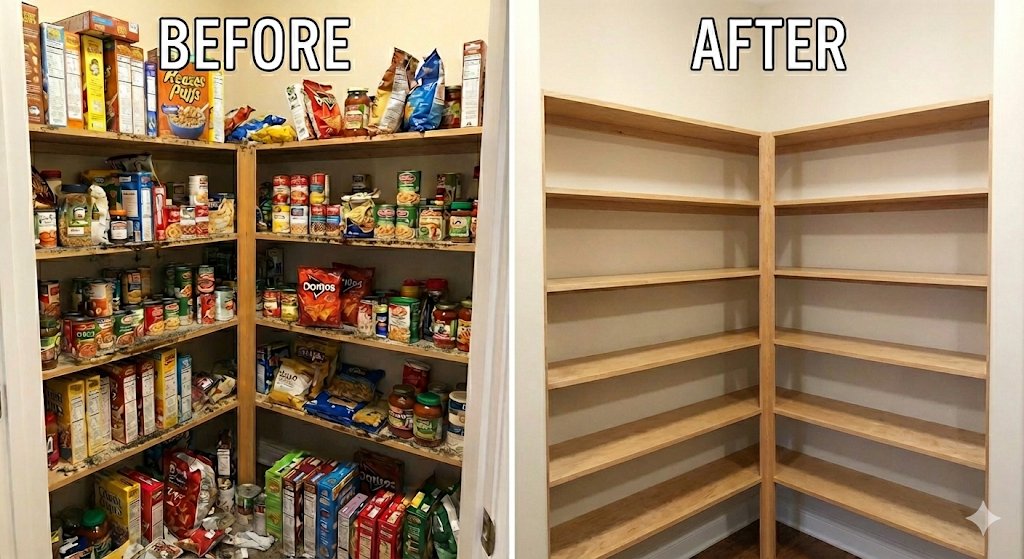
Step 3: Deep Clean Pantry Shelves
Now that the shelves are bare, your will be both shocked and amazed how did all those things fit there?!? Get your surface spray and give those shelves a good scrub.
If you want to add shelf liners or contact paper to make it pretty, this is the moment to do it!
Step 4: Check Expiry Dates and Declutter
Look at your mountain of food. Pick up every single item and check the date. If it expired when Malcolm Turnbull was still Prime Minister, bin it. If it’s stale, bin it. If you bought it for a diet you tried for 3 days last year and will never eat it, bin it.
Be ruthless. Clutter is often just delayed decisions. If you haven’t used that obscure spice mix in 12 months, you aren’t going to use it next week.
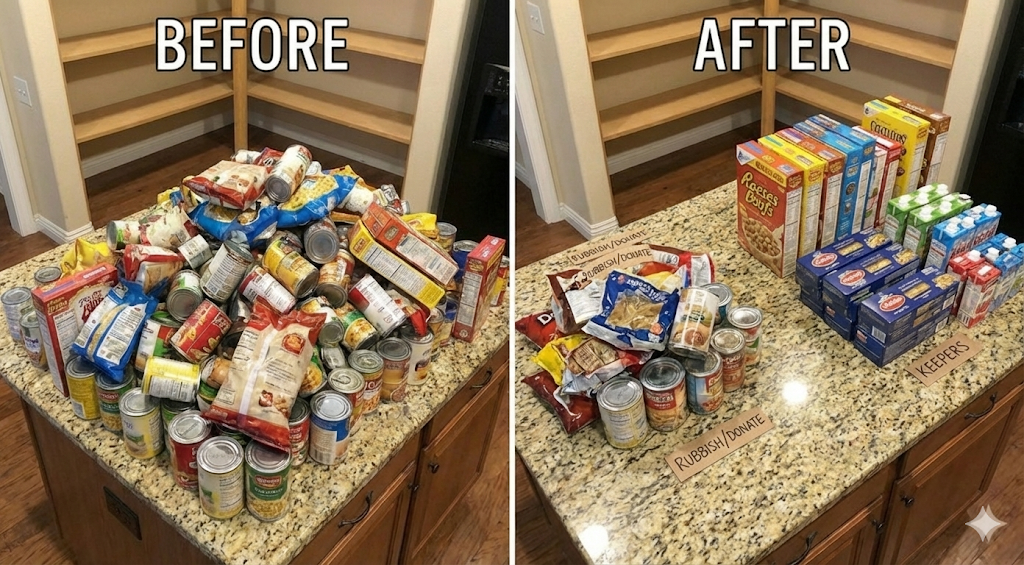
Step 5: Group Similar Items Together
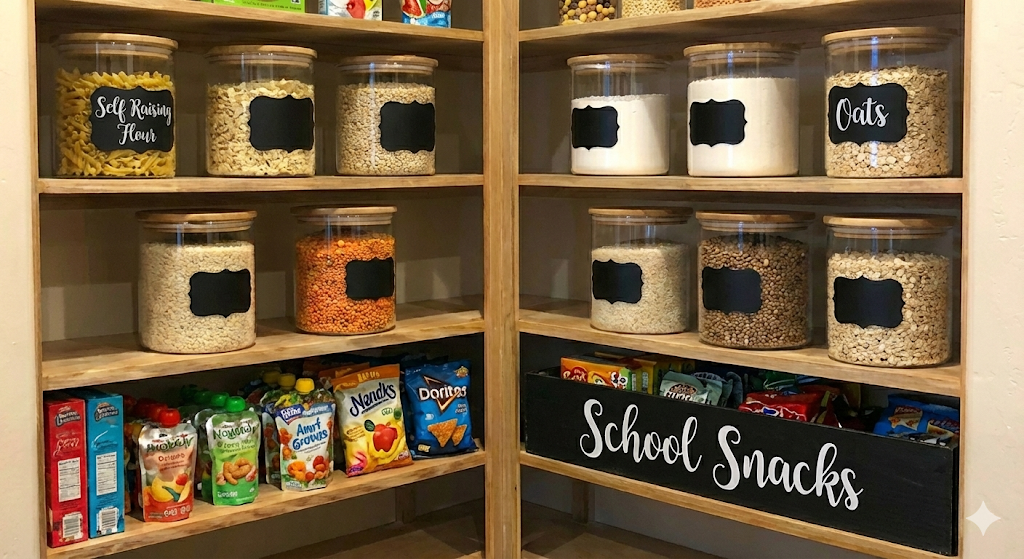
Sort your “Keep” pile into families. This is the logic phase. If you put the taco shells next to the icing sugar, you are setting yourself up for failure. Grouping items by usage makes life easier when you are organising kitchen pantry zones or rushing to cook dinner.
Here are the most common “Piles” every Aussie family needs:
- The “Weeknight Dinner” Pile: Pasta, rice, noodles, taco kits, simmer sauces, and packet sides.
- The “Baking” Pile: Plain/self-raising flour, sugars (white, brown, icing), baking powder, sprinkles, and patty pans.
- The “Breakfast” Pile: Cereal boxes, oats, muesli, and the daily essentials (Vegemite, honey, peanut butter).
- The “Tin” Pile: Canned tomatoes, beans, corn, beetroot, tuna, and coconut milk.
- The “School Lunchbox” Pile: Muesli bars, fruit cups, popcorn, Le Snaks, and sultana boxes.
- The “Entertaining” Pile: Savoury biscuits (Jatz/Savoys), crackers, nuts, and pretzels.
- The “Flavour” Pile: Oils, vinegars, soy sauce, stock cubes, and spices.
- The “Treat” Pile: Chocolate blocks, lollies, and sweet biscuits (keep this one small!).
Think about how you cook, what is the most convenient way for your daily routine? If you always use taco shells and salsa together, group them!
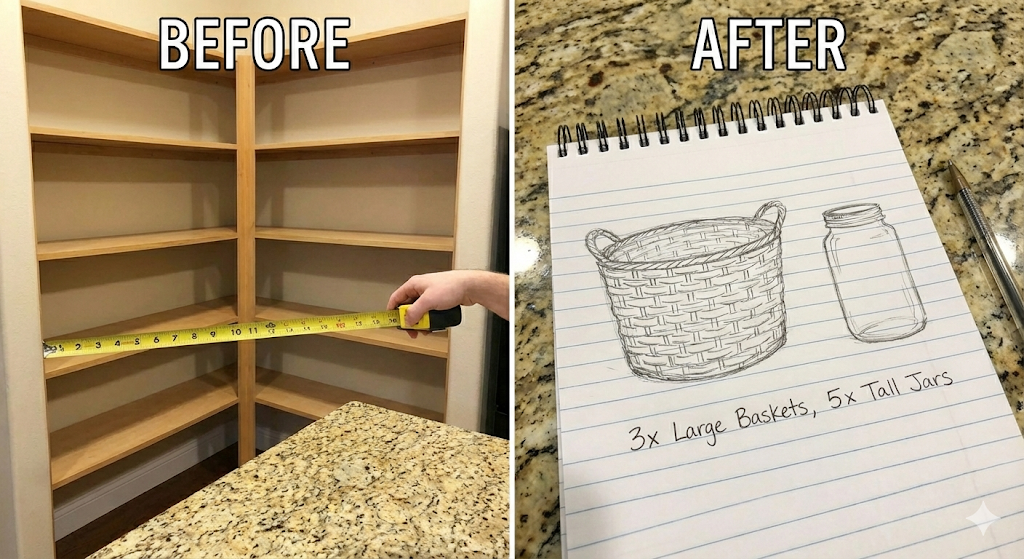
Step 6: Measure Shelves for Storage Containers
Don’t run to the store just yet! Measure the height and depth of your shelves. Check your groups from Step 5. Do you need a big tub for chips? Or tall jars for spaghetti?Now you can go shopping (or raid your existing Tupperware drawer) for food storage containers that fit those specific groups.
Square or rectangular containers save space. Round jars waste the corners of your shelf!
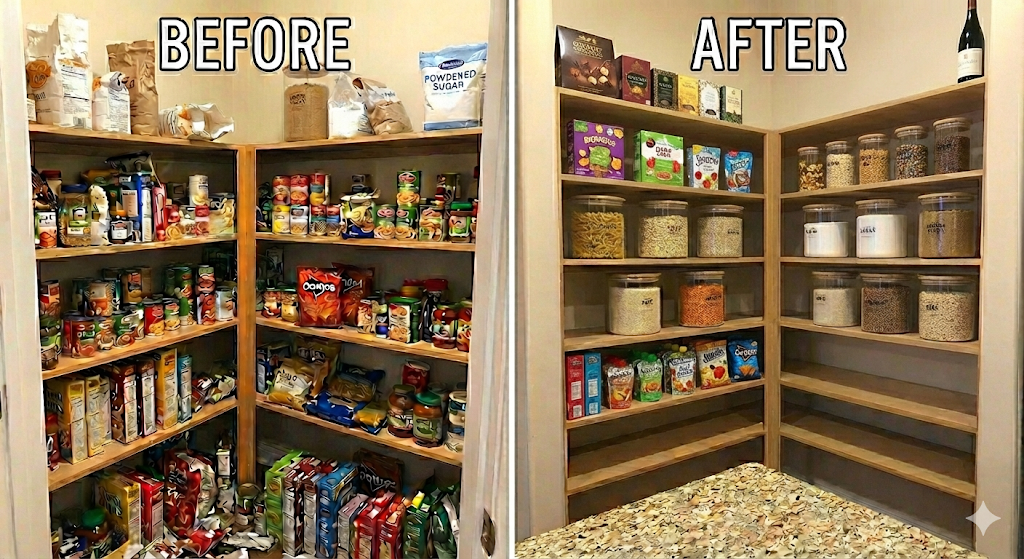
Step 7: Decant Dry Goods into Airtight Jars
This is the visual game-changer. Take your dry goods (rice, pasta, flour, cereal) out of their flimsy cardboard boxes and pour them into your clear, airtight containers. It is best to use clear containers so you can identify contents quickly. This helps keep food fresh longer and stops weevils from moving in.
Cut out the cooking instructions/expiry date from the original packet and tape it to the bottom or back of the new container. You don’t want to forget how long to boil that pasta!
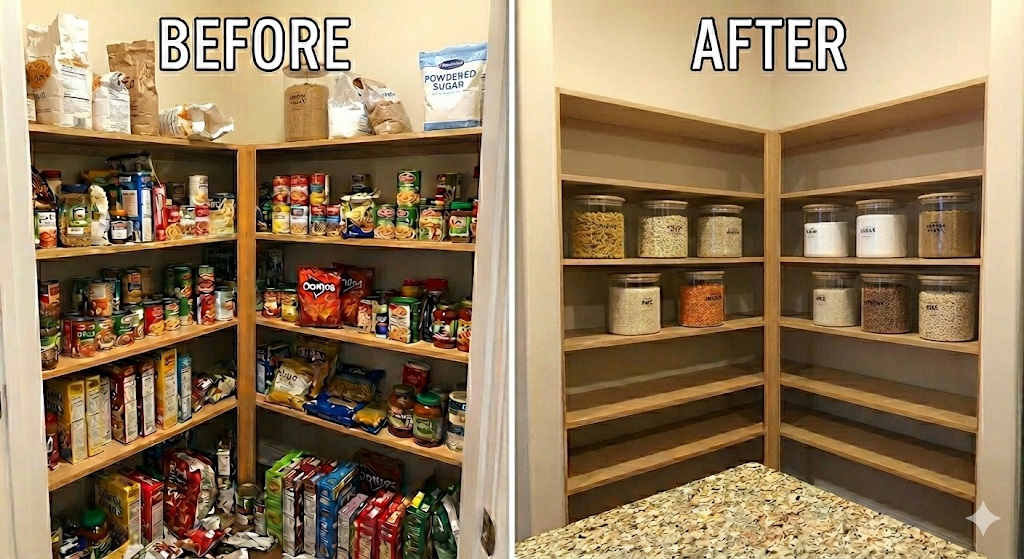
Step 8: Create Pantry Zones for Accessibility
This is about strategy.
- Bottom Shelves: Heavy items (bulk rice, appliances).
- Low/Accessible Shelves: Healthy kids’ snacks (muesli bars, dried fruit) so they can help themselves, or quite the opposite, put it higher if you don’t want them to help themselves.
- Eye Level: Weeknight dinner staples (pasta, sauces). That also works great for your husbands to find it easier.
- Top Shelf (The Danger Zone): The chocolate, the lollies, and the alcohol. Keep this out of sight and out of reach of little hands!
Fun fact is that If you put the healthy snacks right where the kids can see them, they are 50% more likely to grab them instead of asking you for chips.
Step 9: Label Every Container Clearly
Whether you use a label maker, or just a white chalk pen, you must label your containers and baskets. Labels aren’t just for looks; they tell other family members where things belong so they don’t mess up your organised kitchen pantry or your hard work.
Use broad categories for baskets like “Salty Snacks” or “Dinner Prep” rather than specific ones like “Pretzels.” It gives you flexibility to use less containers and baskets for more purposes.
3 Pantry Hacks That Will Save Your Sanity
You’ve got the basics down, but if you want to take your pantry from “clean” to “life-changing,” you need these three secret weapons.
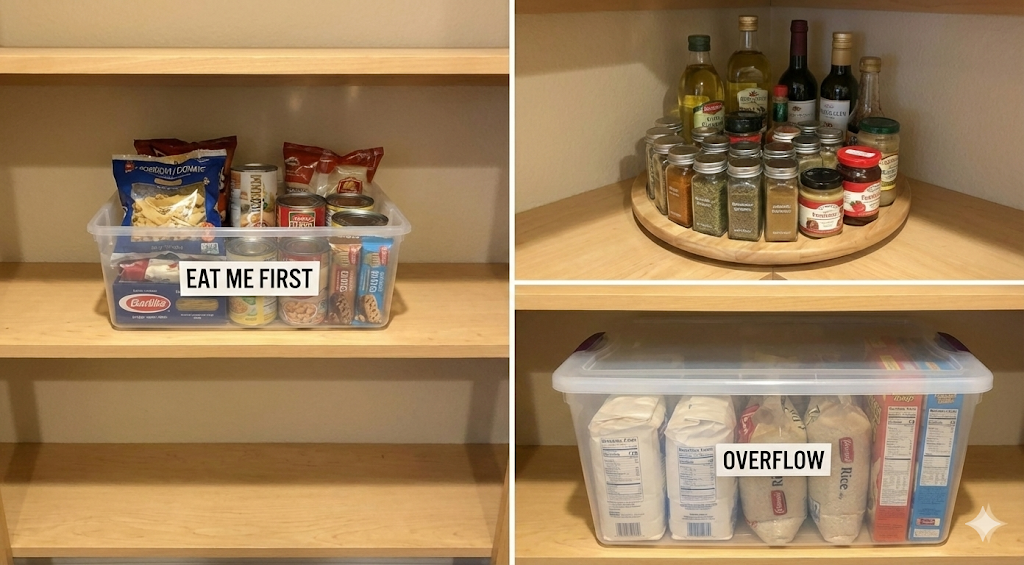
- The “Eat Me First” Bin: This is a game-changer for the budget. Grab a dedicated basket and label it clearly. Any open packets of crackers, snacks that are going stale, or tins nearing their expiry date go in here. The rule for the family is simple: You must check this bin before you open a fresh box of Shapes or Tiny Teddies. It stops food waste and saves you money!
- The Lazy Susan (Turntable): Pantry corners are usually black holes where jars go to die. Stop reaching over five different bottles just to find the soy sauce. Pop a Lazy Susan in the corner for your oils, vinegars, and sticky sauces. One quick spin, and you can grab what you need without knocking over the olive oil.
- The “Overflow” Tub: So, you bought a 2kg bag of rice, but your pretty new jar only fits 1kg. What do you do with the rest? Do not leave the half-empty bag cluttering up your shelf! Get a large, opaque tub for the top shelf labeled “Back Stock.” Put all your half-empty refill bags in there. It keeps the main shelves looking Instagram-ready while keeping the refills fresh.
Step 10: Follow the “One In, One Out” Rule
You’ve done it. It looks beautiful. But how do you keep it this way? The Golden Rule.
If you buy a new box of crackers, the old box must be finished or tossed. If you empty a jar, wash it immediately. Do not shove a bag of groceries into the pantry without unpacking it properly. This habit is the only thing standing between you and chaos returning. This is how you organise pantry pro style!
Schedule your pantry ‘mini-reset’ to fit your routine, based on when you usually do the weekly shop. Spend 5 minutes tidying the shelves before the week starts. It saves hours of cleaning later!